Wednesday, 30 April 2014

Basic Crusty Bread


Baking a loaf of bread from scratch can be very intimidating. It was for me at least. But the force behind giving it a try is not to feed my family a store bought one full of preservatives and chemicals. And I could not be happier that I tried and It was well worth the effort. Nothing can beat a warm slice of bread with a slice of cheese or a dab of butter.
It just needs a handful of ingredients and a lot of patience, the results will not be disappointing. Here is how it goes:

Ingredients


Flour                   2 cups + for dusting
Yeast                  1 tsp
Salt                     1 tsp
Water                 1 1/4 cup
Sugar                  1 tsp
Corn Meal          1/2 cup


Method


  1. Add flour and salt in a bowl and mix.
  2. Warm the water where it is comfortable to touch. Add sugar and yeast and let the yeast bloom.
  3. Once the water is all bubbly and frothy, add to the flour mix. Using your hands or the wooden spoon, incorporate water into the flour.
  4. Dust the surface you are using to kneading with the flour and invert the flour mix over. Knead the flour flour for 8-10 mins. Do not add a lot of flour while kneading. Dough is going to be sticky, thats how you want it.
  5. Oil a bowl big enough to hold 5-7 cups of mix and put the ball of dough in.
  6. Cover and let rest till its double in size around 90-120 mins.
  7. Dust the surface again and invert the risen dough. Trying not the deflate much, cut the dough into three portions.
  8. Flatten the dough very gently and roll it like a cigar into a log.
  9. Spread the corn meal on the bottom of a cookie sheet and place the logs 4 inches apart.
  10. Make slits on the top by using a very sharp knife. Cover with a wet cloth and keep at a warm place for the dough to rise around 45-60 mins. 
  11. Place a heavy cast iron pan in the bottom rack of the oven and preheat your oven at 500. Start preheating right when you are done with making the logs.
  12. When the logs have risen, Add cold water to your pan in the oven. It will create steam instantly which helps to develop the crunchy crust on the bread. Place the baking sheets on the medium rack of the oven and bake till golden brown on top around 20-25 mins. To check if the bread is cooked through, just knock on it using your knuckles and sound should be hollow.
  13. Immediately turn them onto a cooling rack if using later or serve right away.
Note:

You can top it with sesame or black seed if desired.


Monday, 28 April 2014

Chicken Sandwich


Sandwich is a versatile package of yummy goodness. You can stuff the with anything of your choice from meats to vegetables, choices are just endless. All you need is a good bread and fresh toppings. I some times involve my kids into it and they have the freedom to choose the fillings they want in their sandwiches and they come up with their own favourite combos.
This is basic chicken sandwich. I normally make a big batch of this chicken spread over the weekend and use it for lunch boxes.

Ingredients


Chicken                              1 breast
Mayonnaise                         2 tbsp
Salt                                      to taste
Black pepper                       1/4 tsp
Sour Cream                         1 tbsp
Hot Sauce                            2-3 shots (optional)
Bread                                  4 slices
Tomato                                1 thinly sliced
Lettuce                                 2 leaves sliced
Cucumber                            8-10 slices
Butter                                  2 tsp


Method


Sprinkle salt and pepper on the chicken breast and bake in the oven at 350 until juices run clear. Alternately, boil the chicken until done.
Cool down and then shred the chicken.
Add sour cream, mayonnaise, hot sauce, salt and pepper.  Mix and taste for the salt.
Apply butter on the bread slices and toast till golden brown.
Apply the chicken spread generously on one slice. Lay tomato slices followed by cucumber slices and lettuce.
Serve immediately or as a cold sandwich.


Friday, 25 April 2014

Chana Masala


Chickpeas are a rich source of vegetarian protein. They are excellent source of fiber, protein and iron. A very versatile crop when it comes to cooking. It is used in powder forms for making breads, fritters and desserts etc. In whole forms its is used in curries, salads, dips etc. This is a curry recipe normally served in breakfast but its a good addition to any dinner buffet as well.


Ingredients


Ingredients #1

Chickpeas boiled                            6 cups
Salt                                                1 tsp or to taste
Crushed red chilli                           1-2 tsp Adjust heat according to your taste
Kalonji/ Black seed                        1/5 tsp
Cumin seeds                                  1 tsp
Soda bi carb                                  1/4 tsp
Water                                            2 1/2 cups
Cloves                                           3
Garam masala                                1/2 tsp
Black cardamom                           1 cracked
Cinnamon stick                             2 inch piece
Dry Pomegranate seeds                1 tsp

Ingredients #2

Cumin                                         1 tsp
Coriander seeds                          1 tbsp
Black pepper seeds                     1 tsp


Ingredients #3

Onion 2 finely chopped
Green chilli whole 4-5
Oil 1/2 cup


Method


Put all the above ingredients #1 in the pot n let cook till chickpeas become very soft to touch.
If using canned chickpeas, start with less soda bi carb as they tend to have different consistencies. Let them cook on low simmer for 30-40 mins. 

Dry roast ingredients #2 spices and crush them roughly. 
Add them to chana mixture in last 10 mins of cooking. 

From ingredients #3 fry onions in oil till they start browning. 
Add green chilli just for 10 seconds at the end. Add half of the mixture to Chana n let cook for 10 mins. Take out in the serving platter and add remaining onions n oil mixture as tempering on top of the serving dish.
You can always adjust heat by decreasing the amount of chillies.

Thursday, 24 April 2014

Long Squash yogurt dip - Lauki Raita


Long squash is one of the cooling vegetables. y mother used to make this raita very often during the hot summer days. Its easy to make and is a perfect accompaniment to pulaos or any meat dishes.


Ingredients


Long squash                                    1 peeled and grated
Yogurt                                             2-3 cups
Salt                                                  1 tsp
Black pepper                                   1/4 tsp
Onion                                              1/4 finely chopped
Tomato                                           1 finely chopped
Sugar                                              1 tbsp

Method


  1. Put grated squash in a pot with half a cup of water and cook for 10-15 mins until most of the water is evaporated and squash is tender.
  2. Drain and keep aside till it cools down.
  3. Whisk the yogurt with salt, pepper and sugar.
  4. Chop onion and tomato finely and add to the yogurt.
  5. Add drained squash and mix. Serve chilled.

Note:

I used smoked paprika for the top.

Wednesday, 23 April 2014

Crispy Spicy Baked Potato


Potatoes are most palette friendly food whether its for kids or for adults. I prefer baking potatoes instead of frying them as it more healthy. Addition of cumin gives a wonderful smokey aroma to humble potatoes. They are crunchy from outside and soft inside. A wonderful side dish with baked chicken, steaks or fish.
I like them with skin on as skin is crispier than the flesh and it adds a nice texture contrast as well but you can peel them if desired. 

Ingredients


Baking Potato                            4 cut in chunks (preferably russet)
Salt                                            2/3 tsp or to taste
Cumin powder                           1 tsp
Red chili powder                        1/4 tsp
Black pepper                             1/4 tsp
Olive oil                                     4-5 tbsp


Method


  1. Preheat the oven at 400 for 15-20 mins. 
  2. Put the cubed potatoes on a baking dish. 
  3. Sprinkle all the dry spices and coat potatoes with it on all sides.
  4. Drizzle olive oil on potatoes and mix well.
  5. Arrange potatoes in a single layer and bake for 50-60 mins till crispy golden and fork tender.


Tuesday, 22 April 2014

Perfect Seekh Kabab


Seekh kababs are one of the famous kababs and one of the trickiest ones to make. So lets demystify the seekh kabab making process. A lot of people think it must have a lot of spices but surprisingly it contains a few ingredients but it involves a few tricks to keep them intact. That's where the problem starts. In the following recipe, I have tried to write down those tricks so you end up with nice, long and perfectly cooked sekkh kababs. They are normally made with minced beef but you can use mutton/lamb as well.
The first trick is to get the right type of mince. Buy the meat from chuck or outside round and for every 500 gms of meat add 100 gs of fat from around the kidney. Ask the butcher to pass it through the machine twice with the smallest setting he has.
Second trick is how to form seekh kababs. The technique to make nice kabab is to wet your hands and make a flat disk of meat like you would for a patty. Put the skewer/ seekh in the middle and form a cylinder of meat around it using your palms to tighten it  around the skewer well.
Keep wetting your hands and thinning the meat around the skewer using your palms not your finger with even gentle pressure. Once you reach the desired length and thickness, take excess off from the top end of the skewer.
Third trick is how to BBQ them. For cooking the kabab is to change the sides and let it cook evenly on medium high heat on all sides at the same time. If u try to cook one side first and then the other, they will break and fall down.
It is best to use skewers with four sides as it allows to cook evenly from all four sides and decreases the chance of breaking the kababs. 
Now lets start with the ingredients.


Ingredients


Beef Mince                            2 lbs (lean)
Beef fat                                  200 grams
Onions                                   2
Green chili                              4
Salt                                        2 tsp
Red chili flakes                       1 tsp
Allspice powder                     1/2 tsp
Garam masala                        1 tsp
Suji/Semolina                         1 tbsp fine grain/ no2


Method


If you have a food processor, add onions and green chilli and pulse till fine. Add remaining ingredients and turn on until it all comes together as a dough. Let rest for half an hour before putting it on seekh/skewer.

If you don't have food processor, Grate the onions on a grater and chop green chili as finely as you can. Take a big bowl and add everything in it. Knead the mixture like you knead your roti dough.
Keep kneading until it all comes together in a ball, that might take 5-8 mins. Rest is the same process as above
Form seekh kababs and grill on medium low heat till nice golden brown on all sides.

Monday, 21 April 2014

Baked Salmon with Pineapple salsa, garlic asparagus


Salmon is one of our favourite type of fish. I love it baked and left overs are great in sandwiches or on top of the salads. This is my preferred way of making salmon as it needs minimal preparation and meal is on the table in under half an hour. Sides are your personal choice. My kids loves asparagus so normally serve it with roasted asparagus but you can replace it with roasted baby potatoes or steamed broccoli and carrots.


Ingredients


Salmon                                          6 pieces
Mayonnaise                                   2 tbsp
Yogurt                                          2 tbsp
Salt                                               1 big pinch per piece
Fresh Thyme                                 1 tsp Chopped very fine
Olive oil                                        1 tbsp
Red chilli flakes                             1 tsp (optional)
Black pepper                                 1/2 tsp

Method


  1. Place salmon pieces skin side down on the baking dish. 
  2. Mix all the ingredients and brush the mixture on fish and let it rest for 20-30 mins. 
  3. In the mean time preheat oven at 450.
  4. Bake the fish on top rack of the oven.
  5. Baking time varies according to the thickness of fish. Rule of thumb is 7 mins per inch of thickness of the fillet.

Pineapple salsa

Ingredients


Fresh pineapple                       2 cups
Green chilli                              1
Fresh lemon juice                     2 tbsp
Salt                                          2 pinches
Coriander                                1 tsp

Method


  1. Chop the pineapple in small chunks.
  2. Remove the seeds and chop the green chili very finely.
  3. Put all the above ingredients in a bowl and mix them all well and its ready.
Find the Garlic Roasted Asparagus here.

Sunday, 20 April 2014

Garlic Roasted Asparagus


Asparagus is a spring time vegetable. We love its tender succulent tips. You can boil them, steam them or bake them. My preferred way to cook asparagus is baking these beautiful long stems. It cooks very quickly and does not need much cleaning or preparation so its an ideal candidate for a quick meal or a busy night.
Here is how I like to cook it:

Ingredients


Asparagus                                     1 lbs
Garlic                                            2 cloves finely grated
Butter                                            1 tbsp
Olive oil                                         2-3 tbsp
Sea salt                                          1/2 tsp
Freshly ground black pepper          1/2 tsp
Crushed red chilli flakes                  1/2 tsp
Thyme                                           1 tsp chopped


Method


  1. Preheat the oven at 400 degrees.
  2. Wash asparagus thoroughly and snap the bottom ends around 1 inch.
  3. Make your compound butter by mixing the grated garlic, butter, olive oil, salt, pepper, crushed red chilli and thyme.
  4. Arrange asparagus on the baking sheet in single layer and brush the butter mixture on top. Sprinkle a pinch of sea salt on top.
  5. Bake in the oven for around 20-25 mins. It should be crisp not mushy when ready.
  6. Serve as a side with steak, baked chicken or fish.

Thursday, 17 April 2014

Ghee - Liquid Gold


Ghee is the traditional way of using animal fat in cooking. Since the uproar of cholesterol, use of ghee has declined but still nothing beats its unique flavour. There are a few things in my cooking that I will not make without ghee as the flavour and texture ghee imparts cannot be attained with any other type of oil. I use it in my cooking quite often and always have a stock in my pantry. During last week's pantry cleaning, I found a bottle of ghee hiding behind all the stuff and the date told me it was 2 years old. I was surprised to open the bottle as it still smelled fresh- way fresher than the store bought. Ghee making just take one ingredient and nothing else. I remember my mother making butter out of the cream collected from the milk. Since in Canada, we only get homogenized milk so there is no way of collecting fresh cream, I use any good quality unsalted butter. In this recipe, I used four pounds of butter and it gave me a little more than three pounds of ghee.

Ingredients


Butter                                4 packs 454 gms each


Method


  1. Put the butter in a 5 litre pot. Its better to use a big pot since it bubbles up after boiling.
  2. Melt on medium heat, once melted reduce the heat to low. Do not stir once the butter is melted.
  3. You will see a lot of foam forming on top. I prefer skimming that foam off as it gives a clear ghee but it will cook away even if you don't remove it.
  4. Let the butter cook till you see brown bits forming at the bottom of the pan, it can take upto 90-120 mins depending on the moisture content in your butter. It is very important to keep an eye on butter at this stage as it tends to burn very quickly. Do not over brown the bottom or else ghee will smell of burnt butter. Once bottom is nicely brown, take it off the heat.
  5. In a sterilized jar with a tight fitting lid, pour the ghee carefully leaving the brown bits behind.


Notes:

You need to take care of the following things carefully to get beautiful golden, clear ghee.

  • Do not stir ghee during cooking process.
  • Do not over brown the bottom. You just need light golden color.
  • You may add a pinch of flour to get grainy texture.
  • For the longer shelf life, you need to cook all the whey at the bottom or else ghee will go rancid very quickly.
  • Don not discard the brown bits as they taste amazing in pulaos, halwas or you can even use it during kneading of your chapati flour.
  • You can add spices of your choice to have flavoured ghee like cardamom, cloves, cinnamon etc.

Wednesday, 16 April 2014

Mango Kulfi


Kulfi is a frozen dessert from the hot weathers of the Punjab region. This rich, creamy nutty indulgence is very refreshing in the hot humid days. Mangoes are in abundance in summer so mango flavoured kulfi is just a match made in heaven. Traditionally the milk was cooked on low flame for hours to attain this but now with fast and busy lives it is not possible for most of us to do that. That doesnot mean we should deprive ourselves from this. Here is my quick version of Mango Khoya Kulfi. I like to serve them coated with almonds, coconut or pistachio. Easiest dessert to make, just need a bit planning as you need time for it to freeze well.


Ingredients


Whipping cream (at least 35%)                          1 liter
Ricotta cheese                                                   200 gms
White bread slice                                               1  edges removed
Green cardamoms                                             2
Almond meal                                                     2 tbsp
Mango pulp                                                      400 ml
Condensed milk                                               200 ml
Almonds/pistachios/coconut                              to garnish

Method


  1. Put bread slice and half the cream in the blender and blend for five mins. The aim is not to aerate the cream but to blend the slice of bread really well.
  2. Add all the remaining ingredients and blend for about 2 mins. 
  3. Pour in the kulfi/popsicle moulds. 
  4. It needs at least 24 hours to set.
  5. You can also freeze it in baking pan and cut it like kulfa slices.
  6. If you don't have the kulfi moulds, use small disposable cups.


Note:

If you are using ready made pulp, it has some sugar added to it. So add half the condensed milk first and taste for sweetness before adding the remaining milk.

Tuesday, 15 April 2014

Chicken Handi


Chicken handi is a very famous dish. Handi means a clay pot and traditionally chicken was cooked in that. Its creamy gravy keeps the tender morsels of chicken succulent and juicy. We love to eat it with naans but it is equally delicious with plain steamed rice. Its a quick cooking dish made with boneless chicken breast. I have used chicken with bones but by all means you can replace it with boneless chicken meat. Here is how the recipes goes:

Ingredients


Chicken                       2 lbs
Onion                          1 medium
Tomatoes                     2 medium
Ginger                          2 inch pieces cut in julienne
Ghee                            4 tbsp
Salt                               to taste
Paprika                        1 tsp
Sugar                           1/2 tbsp
Dried fenugreek            1 tbsp rubbed
Red chili powder           1/2 tsp
Cream 10 %                 1 1/2 -2 cups

Method


  1. Peel the onion and chop roughly. Peel the tomatoes and chop. Put onion and tomatoes in a pot and add one cup of water. Once it comes to a boil, reduce the heat and cover. Cook till onion and tomatoes have tenderized. Evaporate as much moisture as possible and blend together into a fine paste.
  2. Heat ghee in a pan and add chicken. Sprinkle salt and fry till it changes colour, you don't need to brown it. Adjust the temp to avoid steam gathering into the pot and chicken ending into soup.
  3. Add a couple of table spoons of onion/tomato paste and fry till no moisture is left. Add half of the ginger, fenugreek leaves, red chili powder and paprika.
  4. Repeat step 3 until all the paste and ginger is been used.
  5. Add sugar and cream. Bring to a boil. Lower the heat to minimum and cover till chicken is completely cooked. Taste for salt. Add some water or cream to adjust the desired consistency of the gravy.
  6. Serve hot with rice or naan.


Thursday, 10 April 2014

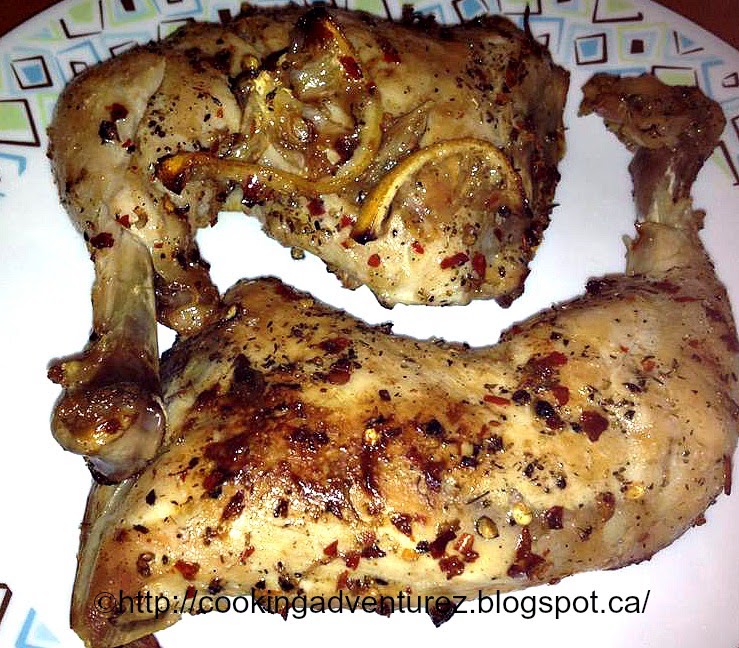
Lemon and Herb Chicken


Chicken is like a blank canvas and you can use your imagination to create delectable wonders with it. I happened to have some chicken legs at home and wanted to make something different than usual tandoori or tikka chicken. So here is the successful experiment for you all to try. It is simple yet delicious. I served it with simple garden salad. You can use any chicken part you have available.

Ingrediets


Chicken pieces                        2 leg quarters
Lemon juice                            3 tbsp + 1 lemon
Garlic cloves                           3 grated
Red chili flakes                        1.5 tsp
Salt                                         1/2 tsp
Fresh Thyme chopped             1/4 tsp
Oregano                                  2 sprigs
Rosemary                                1 sprig
Olive oil                                   2 tbsp


Method

  1. Mix lemon juice, olive oil, salt, chili flakes, thyme and garlic in a bowl and stir.
  2. Rub over the chicken pieces and let it marinate for at least 60 mins.
  3. Cut the lemon in thin slices and line a baking sheet with it. Bruise oregano and rosemary sprigs with the back of your knife and put them over lemon slices.
  4. Preheat the oven at 400 for 15 mins. Put chicken pieces in the baking sheet and bake for 35-45 min until cooked through and juices run clear.


Note:

Cooking time varies according to the size of chicken pieces. Chicken breast will take less time than the leg quarters. You can use chicken with or without skin according to your preference.

Wednesday, 9 April 2014

Pakora - Vegetable fritters


Who does not like fried crispy food. Pakora is a famous snack served anytime with tea or coffee. They use to be a regular item during the rainy moon soon season. The minute its starts raining, pakora preparation comes along with it. There can be many variations in number of vegetables and their proportions. Its a very forgiving recipe so change the vegetables proportion according to your taste buds.


Ingredients


Chickpea flour/Besan                       2 cups
Onion                                              1 sliced
Potato                                             1 sliced like thin french fries
Salt                                                 1 tsp or to taste
Chili flakes                                      1 tsp
Baking powder                               1/4 tsp
Green chili                                       2 sliced
Pomegranate seeds                          1 tsp
Coriander seeds crushed                 1/2 tsp
Cumin seeds                                    1 tsp
Yogurt                                             1 tsp
Garam masala                                  1 tsp
Dried fenugreek                               1/2 tsp


Method


Put everything in a bowl and mix all the ingredients by adding water and achieving the pour-able consistency. Mixture should be soft but not watery or runny.
Heat oil in a wok and using a tablespoon, drop in medium heat oil. Once the bottom starts browning, turn them over and cook other side.
Drain on a paper towel and serve hot with Tomato Walnut Chutney .

Tuesday, 8 April 2014

Chicken Fingers


Here comes another kid friendly finger food. Ideal for school lunches or any time at home. Chicken fingers makes a prefect lunch.

Ingredients


Chicken Breast                       4

Flour mixture


Flour                                     1 cup
Salt                                       1/2 tsp
Red chilli                               1/4 tsp

Egg mix


Egg                                        2
Salt                                        1/2 pinch

Bread Crumb Mixture


Bread crumbs                        1 1/2 cup
Salt                                        1/2 tsp
Red chlli                                 1/2 tsp

Oil for frying


Method


Put flour, add in salt and chilli in a plate and mix well.
Beat the egg with salt and keep aside.
Mix bread crumbs, salt and chilli and keep them in a separate plate.
Cut chicken breast into fingers of desired size.
Make the assembly line in the sequence of flour mixture, followed by egg and then bread crumbs mix.
Coat the chicken pieces in flour. Dust the excess flour off by shaking it gently.
Dip in the egg mixture and then coat them in bread crumbs mix.
Put them on the baking sheet and refrigerate for 30-40 mins. Refrigeration helps the coating to stay on the chicken during frying.
Heat 1.5 inch oil in a frying pan on medium heat. Fry chicken pieces for 5-7 mins on each side until golden brown.

Note:
You can replace bread crumbs with panko, or even coarse corn meal for even crunchier texture.

Friday, 4 April 2014

Home Made Pizza


Whether a child or an adult, its equally loved by all. The crunchy base with gooey cheese topping and crunchy vegetables makes a wonderfully amazing combination. Pizza is such a versatile food when it comes to toppings. You can meats, vegetables, cheeses, herbs, fruits etc. Possibilities are just endless and it all is your imagination. A lot of people are scared of either making the pizza dough at home or sauce. Making dough can be very intimidating for many people. Trust me if you make it once at home, you would never buy pizza from outside as nothing beats the freshness and the love you put in your food. 
My monkeys are very enthusiastic about making their own custom pizzas. I would prepare every thing for them and they roll the dough and put the toppings of their choice. ( I have been successfully feeding them many vegetables like mushrooms and olives in this disguise) You need four things for making your pizza. the dough, pizza sauce, cheese and toppings. Here is how I make my pizza from scratch:

Pizza Sauce Ingredients


Olive oil                                       2 tbsp
Onion                                          1/2 cup chopped
Garlic                                          3 cloves minced
Tomato paste                              1 can
Tomatoes                                    6 large skin removed and chopped
Oregano                                     1 tbsp
Salt                                             2 tsp
Black pepper                              3/4 tsp
Red chili flakes                            1 tsp (optional)

Method


  1. In a large sauce pan, heat olive oil on medium heat and add onions, fry till translucent.
  2. Add garlic and saute for another minute.
  3. Pour the whole can of tomato paste and fry for a couple of minutes to freshen up the flavors.
  4. Add the tomatoes, salt, black pepper, oregano and red chili flakes.
  5. Let it come to a boil and slow down the heat to a simmer, partially cover and let cook for 35-40 mins till thick.
  6. You can blend it if you like your sauce to be smooth or leave it chunky for a rustic feel.

Pizza Dough Ingredients


Water                                  2-3 cups
Flour                                   3 cups
Flour                                   2 cups
Olive oil                              1/4 cup
Yeast                                  3 tsp
Salt                                     1 tsp
Sugar                                  1 tsp

Method


  1. In 2 1/2 cups of warm water, stir in sugar and yeast. Let it sit for 15 mins until frothy.
  2. Add olive oil to the mixture after it is frothy.
  3. Mix 3 cups of flour and salt in a large bowl.
  4. Add in the yeast mix and stir with a wooden spoon or your hands. Let rest for another 10 mins.
  5. Pour the flour out on a well floured surface. (use flour from remaining two cups)
  6. Start kneading and adding flour until the dough is smooth and elastic around 12 mins. (You many not need all two cups of flour)
  7. In a large bowl put one table spoon of oil and put the dough ball in, rub oil all over the dough, cover the bowl with a wet cloth or plastic film and let it sit until it doubles in size around 2-3 hours.
  8. Punch the air out of the dough and make 6 balls. Cover the balls and let rest until they double in size, it may take from 35-50 mins depending on your room temp. 

Assembling the pizza


  1. Preheat the oven at 450 for 30 minutes.
  2. Take one dough ball and roll it to half an inch thick. This thickness will result in a medium thick crust. Spread some corn meal or semolina on your pizza pan and transfer the crust to it.
  3. Spread 4-5 tbsp of  pizza sauce, followed by thin layer of mozzarella cheese. Add any topping of your choice like meat, vegetables, cheeses, herbs etc.
  4. Put mozzarella/provolone cheese on top. Do not overload the pizza or else it wont be crispy.
  5. Bake in the preheated oven at 450 until golden brown on the edges and cheese is bubbling around 12-15 minutes. Wait for one minute after taking out of the oven before you slice it.


Toppings


Olives
Peppers
Red Onion
Green chilies
Tomatoes
Mushrooms
Hot pickled peppers
Broccoli
Anchovies
Chicken
Pepperoni
Beef strips
Chicken Tikka
Spinach
Provolone Cheese
Mozzarella cheese

Thursday, 3 April 2014

Lamb Korma


This is another dish from the royal era when foods were rich with nuts, dairy and spices. It was a dish of weddings and feasts once but not any more. It is delicious so you don't need a special occasion to make it. It needs a bit of preparation time but when you taste it, its all worth it.


Ingredients


Lamb/ Goat                                     2 lbs
Yogurt                                             1 cup
Onion                                              1 thinly sliced
Garlic                                               8 cloves
Ginger                                             1 inch pc
Garam Masala                                 1 tsp
Paprika                                            1 tsp heaped
Salt                                                  to taste
Turmeric                                          1/4 tsp
Coriander powder                            1/2 tsp
Red chili powder                              1 tsp or to taste
Nutmeg                                            1/2 tsp freshly ground
Ghee/clarified butter                         1/4 cup
Saffron strands                                 1/4 tsp


Whole Spices

Cloves                                            6
Green Cardamom                           4
Cumin seeds                                   1 tsp
Cinnamon stick                               1 inch pc
Bay Leaf                                        1

Method


  1. Wash and dry the meat. Beat the yogurt and ginger and garlic paste with all dry , powdered spices leaving saffron strands, ghee and onions.
  2. Heat the ghee in a pot and add sliced onions. fry till nice light golden brown. Do not over brown them as your korma will not be of reddish colour. Take the onions out and lay in a sigle layer over paper towel and leave to get crisp. Once they are crisp, crumble them using your hand or a mortar pestle.
  3. Add the crumbled onions to the marinated meat.
  4. In the same ghee, add whole spices and fry for 15-20 seconds until fragrant.
  5. Add the marinated meat including the marinade to the spices. Fry on high heat until all moisture dries up and you can see ghee separating from the meat. 
  6. Add a cup of water and saffron strands, once it comes to a boil, lower the heat and cover with a tight fitting lid so that steam could not escape.
  7. Cook till the meat is tender and falling off the bone. Keep checking during the cooking process as you may need to add more water.
  8. This is not a soupy curry so adjust the consistency by increasing or decreasing the amount of moisture.


Note:
Best served with naan, brown rice or cumin rice. Many people like to serve it with Pulao as well.

Wednesday, 2 April 2014

Onion and Green Chili Pickle


Pickles are one of the important parts of the meal in our households. They act as a condiments which normally aids in digestion as well. There are many different types of pickles and mostly every household has their own family favourite recipe for it. This is a quick vinegar pickle served beside lentils as a routine on my menus. Its easy to make and accompanies the lentils very well.
Ready in less than 30 mins and its delicious.


Ingredients


Red onions                  2 large
Green chili                   4-6
White vinegar              1 cup
Water                         1/2 cup
Salt                             1 tsp
Red chili powder         1/2 tsp
Sugar                          1 tbsp


Method


Slice the onions in rings about 1/2 cm thick. Separate the onion rings.
Cut green chilies in half or slit them length wise.
Put green chilies and onion in a jar.
Heat the vinegar and water. Add the sugar, salt and red chili powder.
Pour it over the onion and green chilies. Let sit on the counter for half an hour.
Its ready to serve when comes to room temperature.
It keeps well for about a week outside the refrigerator and up to 3 weeks in refrigerator.

Note:

You can also add sliced cucumbers, radishes, olives, turnips, carrots, cauliflower etc.

Tuesday, 1 April 2014

My Mum's Chicken Pulao


Lets start this new month from a family recipe. No one can make it the way my mum makes it (I guess every daughter would say that. Did I say, I am missing her :( ). This one pot meal is my all time comfort food. It was at least once a week dinner during my childhood. These nutty basmati rice cooked in aromatic chicken broth spiced with cloves, cardamom and warmth of black pepper bring back all those wonderful childhood memories. Its so easy to make yet so satisfying. This is a family recipe passed down from last three generations. All you need beside is some salad and yogurt.


Ingredients


Basmati rice                    2 cups
Chicken                          1 whole 2-3 lbs (cut into 14 pcs)
Onion                             1 thinly slices
Tomato                           1 chopped
Green chili                      3-5 (optional)
Ginger                            1/2 inch piece cut in julienne
Garlic                             1 head
Salt                                2 tsp or to taste
Garam Masala                1 tsp
Coriander seeds              1/2 tsp
Cumin seeds                   1.5 tsp
Black pepper                  8-10
Cinnamon                       2 inch stick
Cloves                            6-8
Green cardamom            3-4 cracked
Water                             4.5 cups
Oil                                  1/4 cup

Method


  1. Wash and soak the rice for at least 1 hour.
  2. Heat the oil in a large enough pot to hold  everything. Add in the sliced onions and fry till the edges start browning.
  3. Add tomatoes, chicken and all the spices. Fry the meat until it is browned on all sides ad tomato is completely disappeared. You may need to add a few spoons of water to prevent it from sticking to the bottom.
  4. Add water, head of garlic and bring it to a boil. Cover and let simmer for around 15 minutes until chicken is cooked through.
  5. Take the garlic out and increase the flame.
  6. Add the drained rice to the pot and stir very gently to mix every thing together. Check for the salt at this stage. Salt should be on higher side as rice will absorb the salt during cooking.
  7. Once you see all the water has evaporated, sprinkle the ginger on top and lower the heat to the lowest setting. cover with a tight fitting lid and let the rice steam for at least 15-20 minutes. 
  8. Once you see steam escaping from the edges of the lid, turn the heat off. Let sit for 10 mins before removing the lid.  Using very gentle hands fluff the rice with a fork.


Note:

In step 3, you can add the whole spices tied in a muslin cloth for easy removal. I like to see my whole spices in the rice so I did not use the muslin cloth. or
In step 6 before adding the rice, you can strain the broth to remove the whole spices.